Πώς να αλλάξετε το χρώμα επισκεπτόμενου συνδέσμου σε Chrome, Safari, Firefox
Σήμερα, ήθελα απλώς να μοιραστώ μερικά γρήγορα μαθήματα σχετικά με τον τρόπο προσαρμογής του χρώματος των συνδέσμων που επισκέπτεστε σε διαφορετικά προγράμματα περιήγησης ιστού, ώστε να αποφύγετε να κάνετε κλικ σε ιστοσελίδες που έχουν ήδη περιηγηθεί.
Αυτό είναι χρήσιμο ειδικά όταν εσείς (ή οι φίλοι και η οικογένειά σας) έχετε αχρωματοψία. Για όσους έχουν αχρωματοψία, είναι δύσκολο να διακρίνουν τη διαφορά μεταξύ των χρωμάτων των συνδέσμων ιστού που έχουν επισκεφτεί και των μη επισκέψιμων συνδέσμων, εάν δεν έχουν ρυθμιστεί σωστά. Αυτό μπορεί να κάνει την απλή περιήγηση στο web μια απογοητευτική εμπειρία.
Η διασκεδαστική ιστορία πίσω από αυτό
Την άλλη μέρα ο ξάδερφός μου πέρασε από το διαμέρισμά μου και χρησιμοποιούσε τον φορητό υπολογιστή μου για να ψάξει για κάτι στο Google. Αρκετές φορές τον άκουσα να λέει: «Ηλίθιε με! Γιατί επισκέπτομαι ξανά αυτή τη σελίδα;» Του είπα λοιπόν:
- Εγώ: Γεια σου Daniel, κάνεις κλικ στα αποτελέσματα της σελίδας που έχεις ήδη επισκεφτεί;
- Daniel: Ναι. Δεν ξέρω γιατί.
- Εγώ: Οι σελίδες που επισκεφτήκατε στα αποτελέσματα της Google επισημαίνονται ως κόκκινες και αυτές που δεν έχετε επισκεφτεί είναι με μπλε χρώμα, σε περίπτωση που δεν γνωρίζετε… (Ήθελα απλώς να βοηθήσω)
- Daniel: Νομίζω ότι μου φαίνονται το ίδιο.
- Εγώ: Αλήθεια; (Νόμιζα ότι αστειευόταν)… Γεια, αυτά είναι διαφορετικά χρώματα. Το ένα είναι ανοιχτό μωβ, το άλλο είναι μπλε. Μπορείς να πεις?
- Daniel: Όχι!
Η συζήτησή μας άρχισε να γίνεται κάπως σοβαρή, όπως ίσως μαντέψατε. Ναι, ο ξάδερφός μου είναι κάπως αχρωματοψία — πιο συγκεκριμένα, ερυθρόχρωμος. Χρησιμοποιώ το Chrome και αφού άλλαξα το χρώμα ενός συνδέσμου που επισκέφτηκα από κόκκινο σε πράσινο, μπορούσε αμέσως να διακρίνει τη διαφορά.
Πίνακας περιεχομένων
- Έχετε αχρωματοψία;
- Ο συνδυασμός χρωμάτων στα αποτελέσματα της σελίδας της μηχανής αναζήτησης
- Τρόπος αλλαγής του χρώματος συνδέσμου επίσκεψης στο Google Chrome
- Τρόπος αλλαγής του χρώματος συνδέσμου που έχετε επισκεφτεί στο Mozilla Firefox
- Τρόπος αλλαγής χρώματος συνδέσμου επίσκεψης στο Safari
- Τρόπος αλλαγής του χρώματος συνδέσμου επίσκεψης στον Microsoft Edge
Έχετε αχρωματοψία;
Καταρχάς, δεν χρειάζεται να ανησυχείτε καθόλου για αυτό εάν το έχετε. Τις περισσότερες φορές, η αχρωματοψία είναι γενετική και δεν υπάρχει θεραπεία, σύμφωνα με MedlinePlus. Επίσης, για να νιώσετε καλύτερα, «Υπάρχει γενική συμφωνία ότι παγκοσμίως το 8% των ανδρών και το 0.5% των γυναικών έχουν ανεπάρκεια έγχρωμης όρασης». (Πηγή)
Για να ελέγξετε αν είστε αχρωματοψία, ο πιο γρήγορος τρόπος είναι να ελέγξετε έξω αυτό το άρθρο της Huffington Post. Περιλαμβάνει πέντε εικόνες που προέρχονται από το Ishihara Color Test.
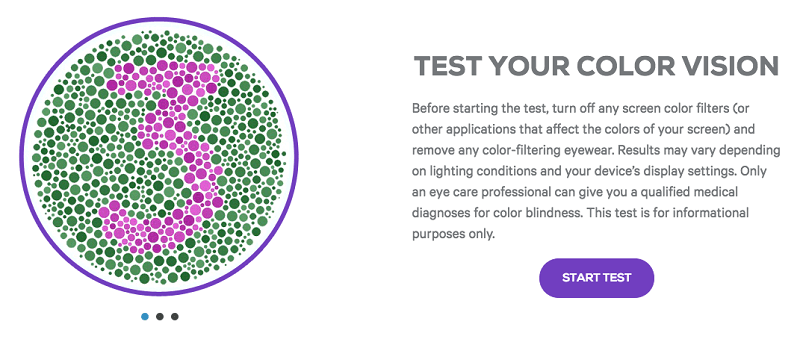
Για περισσότερες δοκιμές, μπορείτε επισκεφθείτε αυτήν την ιστοσελίδα. You’ll be given 20 trial questions before you see your test result. Click the blue “START TEST” to start:
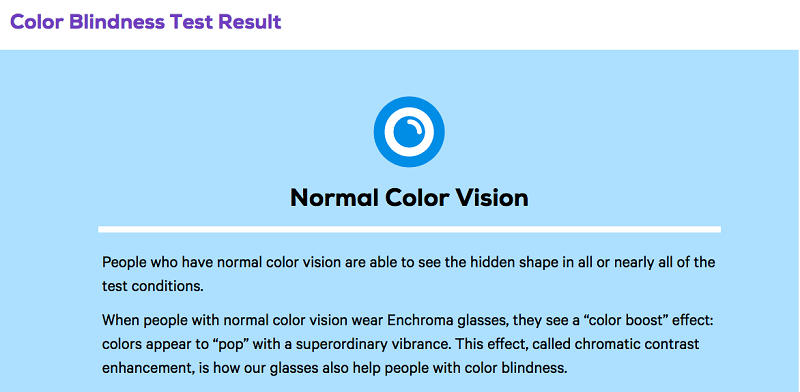
Most people will be told they have “Normal Color Vision”:
Ο συνδυασμός χρωμάτων στα αποτελέσματα της σελίδας της μηχανής αναζήτησης
Note: By default, most search engines such as Google and Bing mark results you clicked through as purple and results unvisited as blue. Ακολουθούν δύο παραδείγματα:
Αυτό προέκυψε αφού έψαξα για το ‘TechCrunch’ στο Google. Εφόσον έχω επισκεφτεί τη σελίδα TechCrunch της Wikipedia στο παρελθόν, επισημαίνεται πλέον ως ανοιχτό μωβ, ενώ το Facebook και το YouTube είναι ακόμα μπλε.

In Bing, I searched “TechFewer” and here’s what I saw. Twitter and Google+ pages are already visited, thus they are marked as purple as well, while the Pinterest link is still blue.

Now let’s get back to the topic. Here’s how to change the color of visited links in different web browsers.
Τρόπος αλλαγής του χρώματος συνδέσμου επίσκεψης στο Google Chrome
Unfortunately for the Chrome browser, you’ll have to add an extension to make it work. Here’s a step-by-step tutorial:
Note: the screenshots below are taken from Chrome for macOS (Version 60.0.3112.101). If you’re on a PC or using another Chrome version, the steps may be slightly different.
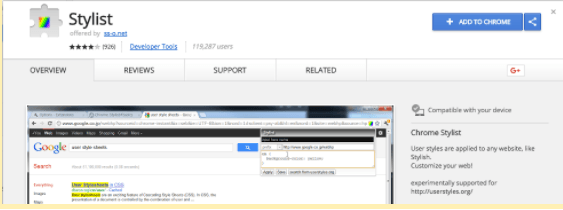
Βήμα 1: Open Chrome, then install this extension called Στυλίστας. Click on the blue “ADD TO CHROME” button.
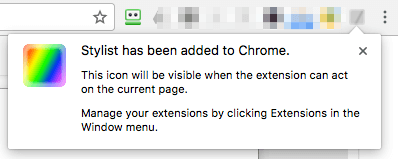
Βήμα 2: Confirm by clicking “Add extension”. You’ll see a notification indicating the plugin has been added to Chrome.

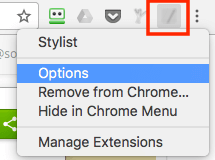
Βήμα 3: Right-click on the Stylist extension icon, then select Options. Under the Styles tab, hit Add New Style.
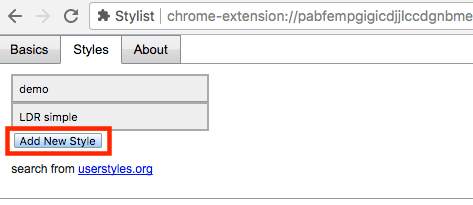
Βήμα 4: Now name the new style, check the “All site” option, copy and paste this piece of code (as shown below) in the box, and click Save.
A:visited { color: green ! important }
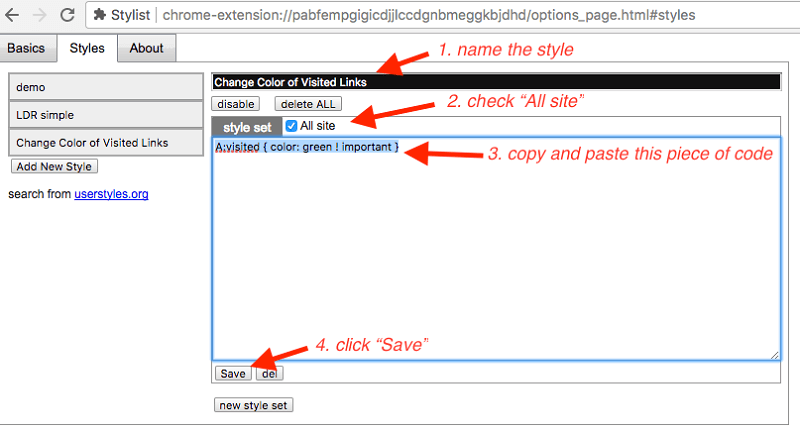
Note: The color of is this line is “green”. Feel free to change it to another color or an RGB code (255, 0, 0 for example). You can find more colors and their codes εδώ.
Important: checking “All site” may affect your user experience with other sites. For example, I noticed that after implementing the change, my Gmail tabs all showed as red. which looks absolutely odd. So I added this rule, which only allows the change to impact specific Google search results.

Βήμα 5: Check if the new style has taken effect. In my case, yes — the color of the visited TechCrunch Wikipedia page is now changed to green (by default, it was red).

P.S. I am used to having the visited link color show up as light purple, so I adjusted it back.
Τρόπος αλλαγής του χρώματος συνδέσμου που έχετε επισκεφτεί στο Mozilla Firefox
Making the change in Firefox browser is even easier because unlike Chrome, you don’t need to install any third-party extension. Follow the step-by-step guide below:
Note: In this tutorial, I use Firefox 54.0.1 for macOS. If you are using another version or are on a Windows PC, the paths and screenshots as shown below may not apply.
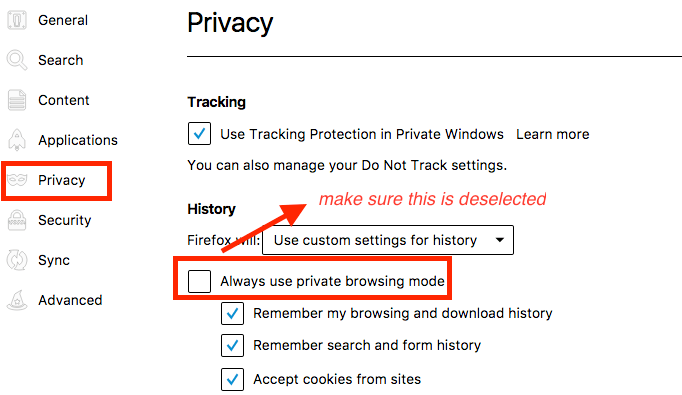
Βήμα 1: Make sure the “Always use Private Browsing mode” option is deselected. Open Firefox Menu > Preferences > Privacy.
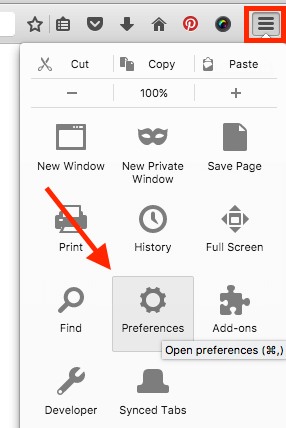
Under History > Firefox will:, select “Use custom settings for history”. If you’ve checked “Always use private browsing mode”, uncheck it. If it’s deselected (by default), you are good. Go to Step 2.
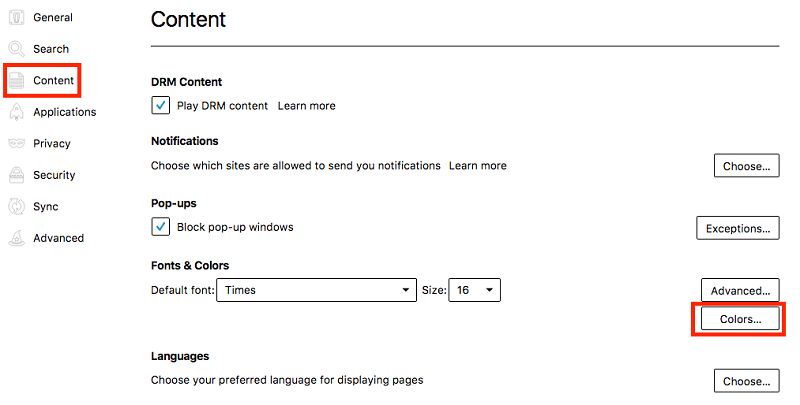
Βήμα 2: Τώρα πηγαίνετε στο Content > Fonts & Colors > Colors.
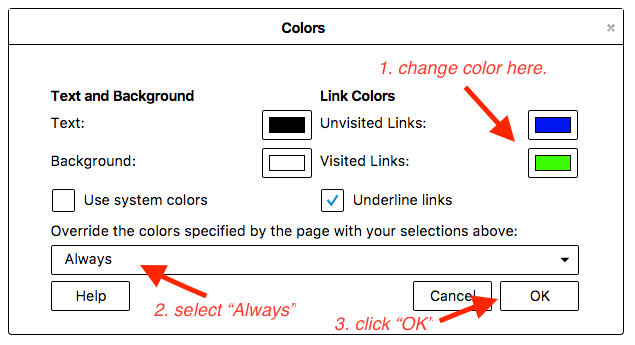
In the “Colors” windows, change the color of “Visited Links:” to your desired one, select Always in the drop-down menu, and click the “OK” button to save your changes.
Βήμα 3: That’s it. To test if the setting change is effective, simply do a quick search on Google and see if the color of those visited results has changed. In my case, I set them as green, and it works.

Τρόπος αλλαγής χρώματος συνδέσμου επίσκεψης στο Safari
The process is quite similar to Chrome’s. You’ll need to install an extension called Stylish. Follow the tutorial below, where I also point out a trick that you need to take care to perform. Otherwise, it won’t work as expected.
Note: I’m using Safari for macOS (Version 10.0). The screenshots shown below may be slightly different from what you see on your computer.
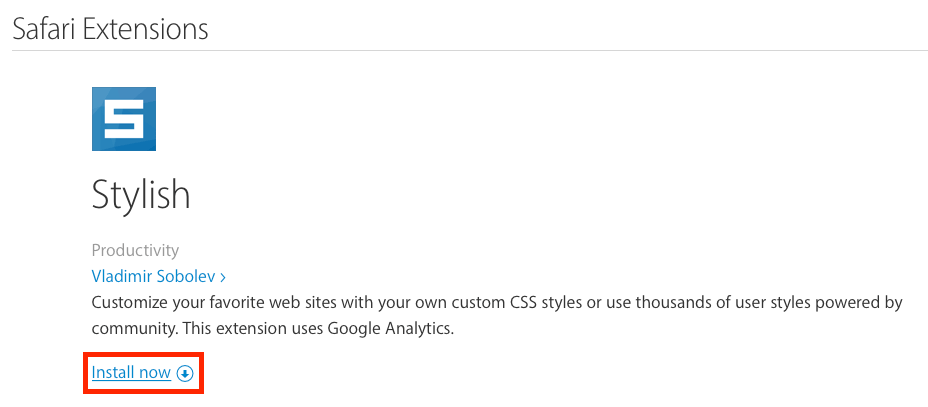
Βήμα 1: Αποκτήστε το Κομψή extension (visit the link) and install it to your Safari browser.
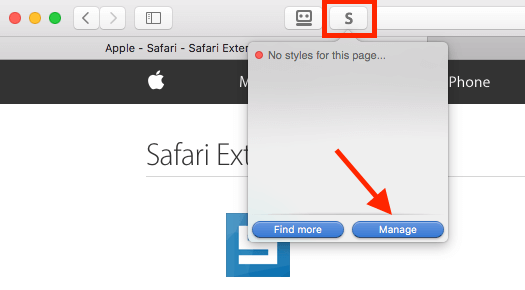
Βήμα 2: Click the Stylish extension icon (located on the top of the toolbar), then select “Manage”.
Βήμα 3: In the new Stylish dashboard, go to Edit. Complete the four tasks as shown in this screenshot. The piece of CSS code is shown below.
A:visited { color: green ! important }
Again, the color in my example is green. You can change it whatever you like. Find more colors and their codes εδώ or εδώ.
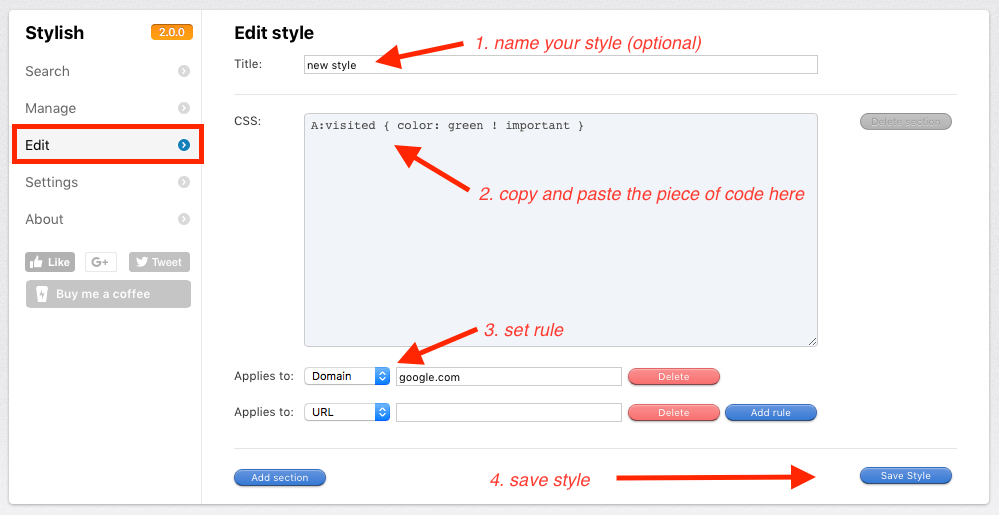
Pay close attention when you set the rules. For example, I wanted to only change the color of visited links in Google.com. I choose “Domain” and type “google.com” under the CSS box. Note: DO NOT type “www.google.com” as it won’t work. It took me some trials and error to figure this out.
Βήμα 4: Test to see if the change has taken effect. In my case, it works.

Τρόπος αλλαγής του χρώματος συνδέσμου επίσκεψης στον Microsoft Edge
Unfortunately, for Windows users, I have yet to find a feasible solution to change the color of visited or unvisited links. I thought the Stylish extension would work with Edge, but I was wrong. However, it seems I am not alone, as you can see from αυτή τη συζήτηση that many people are demanding the feature.
I’ll update this post if Edge adds this function or if there is a third-party extension that does the job.
I hope you found this article useful. Please let me know if you’re unclear about any steps in the tutorials above. If you discover an easier method, leave a comment below and let me know.
Επίσης, διαβάστε
- Πώς να διορθώσετε σφάλματα κάρτας μνήμης SD: Ο απόλυτος οδηγός
- Πώς να κατεβάσετε όλες τις φωτογραφίες από το Facebook
- Πώς να κάνετε εγγραφή οθόνης στο iPhone ή το iPad σας
- Πώς να διαγράψετε την αποθήκευση ‘Δεδομένα συστήματος’ σε Mac
- Πώς να αφαιρέσετε διπλότυπες φωτογραφίες στο iPhone με τις φωτογραφίες Gemini
- Πώς να αδειάσετε τον κάδο απορριμμάτων ή να ανακτήσετε διαγραμμένα αντικείμενα στο iPad
πρόσφατα άρθρα