Skylum Luminar 4 Review: Is It Still Worth it in 2022?
Luminar
Samengevat
Skylum Luminar is a non-destructive RAW editor that provides an excellent range of tools for developing your images. The RAW conversion engine provides a good starting point for your images, and most edits feel snappy and responsive. A completely customizable workflow can dramatically simplify your editing process, so you can focus on exactly what your images need to look their best.
I’m glad to report that this newest version of Luminar has corrected the speed issues that plagued earlier releases. While it can still be a bit slow when switching between the library and edit modules, the most frustrating delays are gone.
Skylum has announced a year-long roadmap of updates they plan for both versions of the software, but this strikes me as a bit strange. It’s the sort of thing you usually see describing upcoming features for subscription-based software, and it’s a bit inconvenient for basic, essential features of a single-purchase program. If they want to include essential organization features like metadata search or a Lightroom migration tool, they should be available at the time of purchase, rather than making customers wait up to a year.
Wat ik leuk vind: Impressive automatic enhancements. Useful editing tools. Edits are quick and responsive.
Wat ik niet leuk vind: PC version is less responsive than on Mac. Organization tools need improvement. Clone stamping is slow and tedious.
Is Luminar any good?
It’s a great RAW editor that allows you to escape the subscription lock-in for many other photo editing software. Casual photographers will love the easy editing process, but professional photographers may be hindered by slow library browsing speeds.
Is Luminar better than Lightroom?
Luminar has a great deal of potential, but it’s just not as mature a program as Lightroom is. You can learn more from our comparison review hier.
Can I upgrade to Luminar for free?
No, it’s not. Luminar is a standalone program and if you are using an older version of Luminar, Skylum offers a discount for an upgrade.
Is Luminar for Mac?
Luminar is available for both Windows and Mac operating systems, and in the initial release, there were some differences in the functionality of the software.
After a couple of small updates, they are essentially the same piece of software now, although the Mac version does allow the setting of basic preferences surrounding cache size, catalog location and backups.
There are slight differences in the context menus when right-clicking/option-clicking throughout the program, although these are relatively minor. The two development teams seem to be a bit out of sync, and the Mac version seems to have received a bit more attention to detail and polish.
Inhoudsopgave
Your Guide Behind This Review
Hi, my name is Thomas Boldt, and I’ve been working with digital photographs for well over a decade. Whether it’s for a client project or for my own personal photography practice, it’s essential to have the best available editing software at my fingertips.
I thoroughly test all the editing programs I review including this one Luminar 4, so you can skip the whole testing process and focus on what matters most to you: producing great photographs!
Detailed Review of Skylum Luminar
Organizing Your Library
One of the most interesting additions to version 3 of Luminar is the Library feature for organizing your photos. This was a major gap in Luminar’s features in previous releases, so it’s great to see Skylum following up on user demand. However, even in version 4, the Library function leaves a lot to be desired. The promised improvements like metadata searching and IPTC metadata compatibility have not been included, even though they’re still in the update roadmap.

Luminar uses a catalog system similar to Lightroom where all your images stay in their current folders on your drive, and a separate catalog file indexes all your flags, ratings and adjustments. You can color-code your images, give them star ratings, and use simple flags for approving or rejecting images.
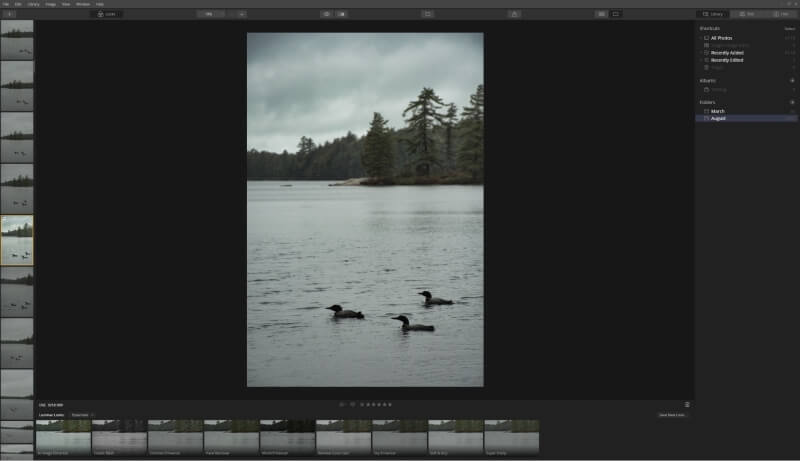
When you’re in single image preview mode, a filmstrip of the current folder is displayed on the left, making full use of widescreen monitor ratios. The size of the filmstrip can’t be adjusted, although it can be hidden, along with the Looks panel at the bottom.
If you’ve been using another library management tool for flags and ratings, none of those settings will be imported along with your photos. IPTC metadata isn’t supported yet, and there is no way to add custom tags to your images. There is also no option to save your adjustments to a separate sidecar file for transferring to another computer.
The only method of sorting images is through the Albums feature, and each Album has to be created by hand. Ideally, it would be possible to create albums automatically based on shared characteristics, such as ‘All 18mm Images’ or ‘All Images Captured July 14 2018′, but for now, you’ll have to stick to dragging and dropping manually.
Overall, the library section of Luminar 4 could use a lot of work, but it still provides a basic set of tools for browsing, sorting, and flagging your photo collection.
Skylum has already released one free update for version 4, and more free updates are planned for the future. They still intend to work on the Library function to address many of the issues I experienced, but you might want to wait until their update roadmap is completed (or at least more matured).
tldr version: If you shoot a lot of images regularly, then Luminar is not yet ready to replace your existing library management solution. For more casual photographers, the basic organizational tools should be enough to keep track of your photos, especially as Skylum continues to update and Luminar matures.
Werken met afbeeldingen
In contrast to the Library section, the core RAW editing features of Luminar are great. The entire editing process is non-destructive and features all of the tools you would expect to find in a great RAW editor, as well as a couple of unique AI-powered tools, Accent AI Filter and AI Sky Enhancer.
Luminar’s editing tools are no longer referred to as ‘filters’, which was just confusing. Instead, the various adjustment tools are grouped into four category sets: Essentials, Creative, Portrait, and Professional. It would be nice to be able to customize this aspect of the layout, but it works more smoothly than the previous filters & workspaces configuration.
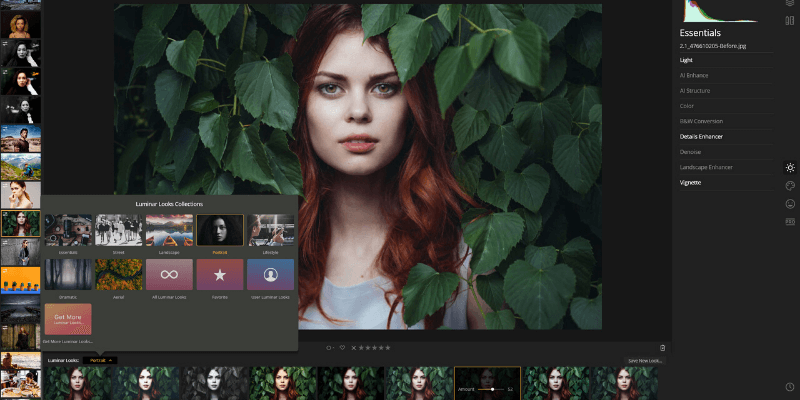
No matter what you call them, Luminar’s adjustments are excellent. Once you find the perfect combination of settings, you can save them as a ‘Look’, Luminar’s name for a preset. Looks can be quickly applied to any of your images using the Looks panel, but they can also be applied to a range of images during batch processing.
The only tool that I found frustrating to use was Clone & Stamp. The tool is loaded in a separate workspace and takes a surprisingly long time to load on both versions of the software. While you’re actually editing it’s fairly responsive, but all your clone and stamp strokes are applied as a single action. If you make a mistake or want to reclone a specific section, the Undo command takes you back to the main editing window and you have to start the process all over again from the beginning.
What About the AI Tools?
Artificial intelligence has become a hugely popular phrase in the software world lately. Every developer is promising huge changes in the way their software works due to some “AI-powered” feature, usually without any more explanation of how AI is used. (It’s become such a popular buzzword that a recent survey of all the “AI” tech startups in Europe found that only 40% actually used AI in any way.)
Skylum doesn’t specify how exactly AI is used in their automatic editing features, but my guess is that it’s using some type of machine learning process to identify which areas of a photo could benefit from specific edits.
Regardless of how it’s done, the automatic adjustments do a decent job of adding local contrast and boosting saturation in most situations, especially landscapes and other wide scenes. Sometimes the saturation boost is a bit too much for my taste, but each photographer has their own idea of how much is too much.
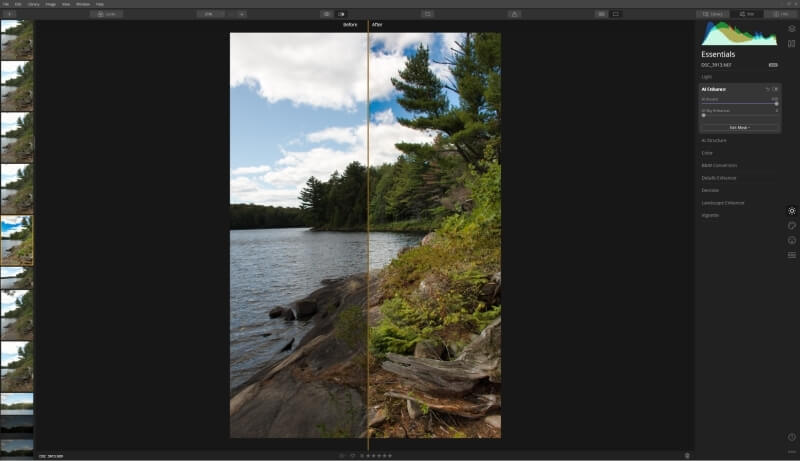
The AI Enhance feature works quite well, although it does run into a bit of trouble around certain complex shapes. This is improved compared to previous versions, but there’s also now the option to draw in your own mask. The extra degree of control is great unless you’re planning on using both AI Enhance and AI Sky Enhancer because you can only apply one mask for both settings.
Another AI feature new to version 4.1 is the AI Sky Replacement tool located in the ‘Creative’ panel. While I would never use this in any of my photos (it’s basically cheating at photography), it’s still an incredibly impressive piece of technology. In the space of about 2 seconds, I was able to entirely replace the sky in the photo of Common Loons shown earlier in the Library section of this review.
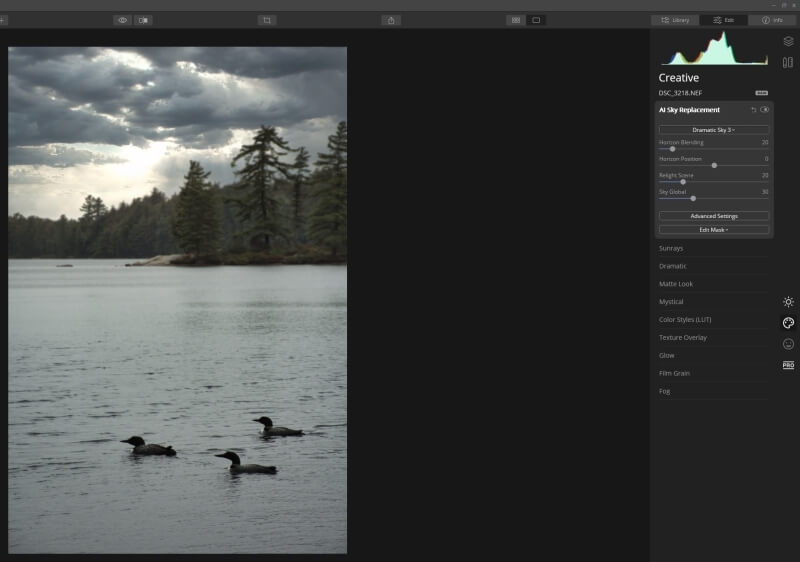
There are a large number of preset sky images to choose from, but you can also load in custom sky images to reduce the ‘cheating level’ by using one of your own source photos. If you’re fine with your images being a creative expression and not a true depiction of the world, then I guess it’s not really cheating after all
Serious photographers will only want to use automatic adjustments as a starting point for their edit workflow, but it can provide a good quick baseline to work from. If you’re a wedding or event photographer who takes hundreds or thousands of images per event, it’s a good way of boosting all your photos quickly before selecting key images for more in-depth attention.
Interestingly, the AI Sky Enhancer and AI Sky Replacement tools are only available in images where a sky is detected. If you try to apply it to an image without a sky, the slider is simply greyed out and unavailable.
Using Layers
Many of the photo editors that want to challenge Adobe have focused on the Lightroom style of non-destructive RAW edits, but neglected the power of layer-based editing found in Photoshop and similar programs. Luminar tries to address that, but the uses of the feature are fairly limited. It’s possible to create separate adjustment layers, allowing you to apply your filters to specific areas of the image in a process usually known as masking. All your filters already come with their own editable masks, but applying them on an adjustment layer also gives you the ability to control the order they’re applied, and to apply blending modes.
U kunt ook extra afbeeldingslagen toevoegen, maar dit is beperkt tot het overlappen van een tweede afbeelding over uw hoofdwerkafbeelding. Dit is handig als je een watermerk wilt toevoegen, maar verder zijn de tools voor het integreren van externe afbeeldingsgegevens iets te basaal om overtuigende composities te maken. De enige uitzondering hierop is de ongelooflijke AI Sky Replacement-tool, maar deze maakt geen gebruik van het laagbewerkingssysteem.
Batch bewerken
Luminar biedt basisbatchverwerking, zodat u een enkele set bewerkingen op meerdere bestanden tegelijk kunt toepassen en ze allemaal kunt exporteren met dezelfde opslagopties. Met behulp van het eerder genoemde ‘Luminar Looks’-voorkeuzesysteem, kunt u een universele set aanpassingen toepassen op een onbeperkt aantal foto’s en de resulterende uitvoer vervolgens opslaan in een reeks afbeeldingsindelingen, evenals in Photoshop- en PDF-bestanden.
Vreemd genoeg is batchverwerking niet geïntegreerd in de bibliotheek, en de enige manier om foto’s voor batchverwerking te selecteren, is door ze handmatig toe te voegen met behulp van een typisch ‘Bestand openen’-dialoogvenster. Dit lijkt een echte gemiste kans, omdat het selecteren van 10 foto’s in uw bibliotheek en deze vervolgens aan een batch kunnen toevoegen, enorm veel tijd zou besparen. Gelukkig is het mogelijk om de functie Aanpassingen synchroniseren te gebruiken om dezelfde aanpassingen toe te passen op een reeks geselecteerde afbeeldingen in de bibliotheekweergave.
Redenen achter de recensiebeoordelingen
Effectiviteit: 4/5
De RAW-bewerkingstools van Luminar zijn uitstekend en gemakkelijk gelijk aan alle andere RAW-bewerkingssoftware die ik heb gebruikt. Helaas is de nieuwe bibliotheekfunctie extreem beperkt in termen van organisatorische hulpmiddelen, en op lagen gebaseerde bewerking en kloonstempels zijn te beperkt om van veel nut te zijn.
Prijs: 4 / 5
Luminar is redelijk scherp geprijsd voor een eenmalige aankoopprijs van $ 89, en er is een hele routekaart met gratis updates die het komende jaar beschikbaar zullen zijn. Er zijn echter goedkopere editors met vergelijkbare toolsets, en als je het niet erg vindt om abonnementskosten te betalen (bijvoorbeeld als je de kosten voor je bedrijf afschrijft), dan is de concurrentie nog serieuzer.
Gebruiksgemak: 4/5
De kernbewerkingsfunctionaliteit is zeer gebruiksvriendelijk. De interface is voor het grootste deel goed ontworpen, maar wat extra aanpassingsopties op het gebied van lay-out zouden leuk zijn. De processen voor het maken van klonen en het bewerken van lagen hebben veel werk nodig voordat ze gebruiksvriendelijk kunnen worden genoemd
Ondersteuning: 5/5
Luminar heeft een geweldig introductieproces voor nieuwe gebruikers en er is veel materiaal beschikbaar op de Skylum-website. Er zijn ook tutorials en leermiddelen van derden beschikbaar, en dit zal waarschijnlijk uitbreiden naarmate Skylum het merk Luminar blijft ontwikkelen.
Luminar-alternatieven
Affiniteitsfoto (Mac en Windows, $ 49.99, eenmalige aankoop)
Een iets meer betaalbare en volwassen RAW-foto-editor, de toolset van Affinity Photo is iets uitgebreider dan die van Luminar. De RAW-verwerking is aantoonbaar niet zo goed, maar Affinity bevat ook enkele extra bewerkingstools zoals Liquify en een betere afhandeling van op lagen gebaseerde bewerking.
Adobe Photoshop Elements (Mac en Windows, $ 99.99, eenmalige aankoop)
Als u de kracht van Photoshop wilt, maar niet zeker weet of u de volledige professionele versie nodig heeft, is Photoshop Elements wellicht de juiste keuze voor u. Het bevat veel begeleide instructies voor nieuwe gebruikers, maar als je eenmaal vertrouwd bent, kun je in de Expert-modi graven voor meer kracht. RAW-verwerking is niet zo verfijnd als Luminar, maar organisatietools en uitvoeropties zijn veel geavanceerder. Lees het volledige Photoshop Elements-beoordeling.
Adobe Lightroom (Mac en Windows, $ 9.99 / maand, alleen abonnement gebundeld met Photoshop)
Lightroom is momenteel niet voor niets een van de meest populaire RAW-foto-editors en -organisatoren. Het heeft een robuuste set tools voor RAW-ontwikkeling en gelokaliseerde bewerking, en het heeft uitstekende organisatietools voor het verwerken van grote fotocollecties. Lees onze volledige Lightroom-recensie hier.
Adobe Photoshop CC (Mac & Windows, $9.99/mo, subscription-only bundled with Lightroom)
Photoshop CC is de koning van de wereld van fotobewerking, maar de ongelooflijk enorme toolset is behoorlijk intimiderend voor nieuwe gebruikers. De leercurve is ongelooflijk steil, maar niets is zo krachtig of zo goed geoptimaliseerd als Photoshop. Als u uw digitale foto’s wilt omzetten in digitale kunst met op lagen gebaseerde bewerking en krachtige op pixels gebaseerde bewerkingstools, dan is dit het antwoord. Lees het volledige Photoshop CC-beoordeling.
Eindoordeel
Skylum Luminar is een geweldige RAW-editor waarmee je kunt ontsnappen aan de abonnementsvergrendeling die je in veel andere populaire bewerkingsprogramma’s vindt. Casual fotografen zullen dol zijn op het eenvoudige en krachtige bewerkingsproces, maar sommige professionele gebruikers zullen worden gehinderd door trage browsesnelheden in de bibliotheek en ontbrekende organisatietools.
Windows users will be happy that the PC version has finally gotten some much-needed speed optimizations. Unfortunately, both versions of the software are still lacking some of the more serious organizational features that will really make Luminar a contender in the world of photo editors.
Dus, vind je deze Luminar-recensie nuttig? Laat hieronder een reactie achter.
Laatste artikels