Dr.Fone Review: Does It Really Work? (My Test Results)

Dr.Fone
Podsumowanie
Wondershare DrFone is an all-around software for managing data on your iOS and Android devices. It can recover your deleted files, backup saved data, and restore it to another device. Additionally, Dr.Fone offers a number of useful tools such as lock screen removal, rooting, screen recording, and more to help manage your phone or tablet. In this review, we’ll focus on the data recovery feature, which is probably the reason why you want to use the program.
It turns out that Data Recovery didn’t go very well during our tests. Photos that were “recovered” were actually photos that were still on the device itself. Some recovered photos did not have the same quality as the originals. Dr.Fone was able to recover a few other things, such as bookmarks and contacts, but the test files we purposefully deleted for the program to find were lost. Your mileage may vary.
We’ll share more details about our findings below. It’s worth noting that data recovery is just one of the many features that Dr.Fone offers. It’s a bit too much for us to review them all at the moment. We should note that we like the all-in-one concept that Dr.Fone pursues; it allows us to spend less money and get more done. In this regard, the program offers value, and we recommend it.
To, co lubię: Reasonable pricing. A LOT of different features and tools for managing iOS and Android devices. Great UI/UX makes the software easy to use and understand. Prompt email response from the Wondershare support team.
Czego nie lubię: The data recovery feature wasn’t able to recover all our files.
What does Dr.Fone do?
Dr.Fone is an app for iOS and Android users to rescue lost data and manage files stored on the device. The program was developed by Wondershare and was originally named Data Recovery for iTunes.
Around XNUMX, the company changed the name of this product and gave it a more branded name: Dr.Fone (which sounds like “Doctor Phone”).
Since then, Dr.Fone has been through a number of major updates. The latest version is capable of backing and retrieving data from iPhone, iPad, and Android devices. The Dr.Fone Toolkit also has a number of smaller utilities that allow you to record device screens, erase data securely, root Android, etc.
What does Dr.Fone include?
The core function of Dr.Fone Toolkit is data recovery — meaning if you’ve accidentally deleted some files off your iPhone, iPad, iPod Touch, or Android-based phone or tablet, the program may help you recover them. Dr.Fone also claims it’s able to restore data when your device is stolen, broken, or unable to boot up, provided that you have a backup.
Meanwhile, the toolkit also includes a few other tools to backup your device, transfer WhatsApp data, record screen activities, wipe out the device before recycling, etc. In this sense, Dr.Fone is more like a suite for iOS and Android users in case of any data emergency.
Is Dr.Fone trustworthy?
Before we wrote this review, we noticed that some people on the Internet had claimed Dr.Fone is a scam. In our opinion, this is not true.
During our tests, we found that Dr.Fone may to be able to recover your deleted items, though the odds are not always XNUMX%. That’s why we encourage you to try the demo versions. Do not purchase the full versions unless you know what they offer.
With that being said, it’s possible that Wondershare or its partners may have launched digital marketing campaigns exaggerating the capabilities of their products, urging potential customers to make purchase decisions with incentives or limited-time offers such as discounts, coupon codes, etc.
Is Dr.Fone safe?
Yes, it is. We tested both Dr.Fone Toolkit for iOS and Dr.Fone Toolkit for Android on our PCs and Macs. The program is free of malware and virus issues after being scanned by Avast Antivirus for PC, Malwarebytes, and Napęd Genius on a MacBook Pro.
Regarding the navigation within the program, Dr.Fone is also safe to use. For example, the Data Recovery module off of your device first, then displays all found files. After that, users have the option to extract that data to a PC or Mac folder.
Can you use Dr.Fone for free?
No, the program isn’t free. But it does offer a trial version that has certain limitations for demonstration purposes.
It’s worth noting that when you’re using the data recovery modules if a scan in the trial version didn’t find your lost data, don’t buy the full version — it won’t find or recover your data either.
Spis treści
Why Should You Trust Me?
Have you ever had your smartphone malfunction, brought it to customer service to have it fixed, and paid a whole lot of money just to have it break again a couple of weeks later?
Hi, my name is Victor Corda. I’m a tech enthusiast with unending curiosity. I tinker a lot with my smartphones and I know I’ll mess them up one way or another. I also had to learn various ways to fix the problems I caused in the first place. Learning how to resurrect a smartphone from the dead has become a natural thing for me.
The process of doing this is quite tedious and requires a lot of research. For this Dr.Fone review, I got the chance to test the program. I hoped Dr.Fone could help cut the learning curve so well that even non-techie people could use the app confidently. To evaluate the quality of their customer support team, I even sent them an email. You can read more below.
Disclaimer: This review is free of any influence from Wondershare, the maker of Dr.Fone. We wrote it up based on our own hands-on tests. The Dr.Fone team has had no editorial input on the content.
Dr.Fone Review: Our Testing Results
Fair disclosure: due to the fact that Dr.Fone is actually a suite including dozens of smaller utilities and features, it’s unlikely that we could test out each feature. We couldn’t mimic every data loss scenario. Also, we have a limited number of iOS and Android-based devices; it’s impossible for us to test the program on all Android phones and tablets. That being said, we’ve tried our almost to give you an in-depth review of dr.fone.
Test XNUMX: Recovering data from an iPhone with Dr.Fone for iOS
Note: The “Data Recovery” module in Dr.Fone actually includes three sub-modes: Recover from iOS Device, Recover from iTunes backup file, and Recover from iCloud backup file. My teammate was unable to directly test the first sub-mode because his iPhone was lost during a trip to Disneyland. You can also move to the “Test XNUMX” section to see results after my teammate used an iPad to test this sub-mode.
Sub-test: Recovering data from iPhone directly
Liane Cassavoy from PCWorld recenzja the very early version of dr.fone. At that time, the program only had two modules. As she put it, “dr.fone tackles iOS data recovery in two ways: Either from the iOS device itself or — in case you’ve lost the device — from an iTunes backup.”
Did dr.fone recover her deleted files? Yes, but not in a perfect way. “I deleted multiple contacts, photos, videos, text messages, and bookmarks, as well as the complete call history, from an iPhone XNUMX, and dr.fone was able to find all of the files except for the deleted text messages.”
As you can see, dr.fone was able to pick up some of her deleted files but not all of them. Another insight from the PCWorld article was that the content of recovered data was not intact. It’s worth noting, though, that the version PCWorld tested was developed in XNUMX.
It’s possible that Wondershare has improved the capabilities of this recovery mode. If you have the chance to test drive this feature on your iPhone, you’re more than welcome to share your results with us in the comments section below. We’ll even consider updating this post to include your experience.
Sub-test: Recovering iPhone data from iTunes backup file
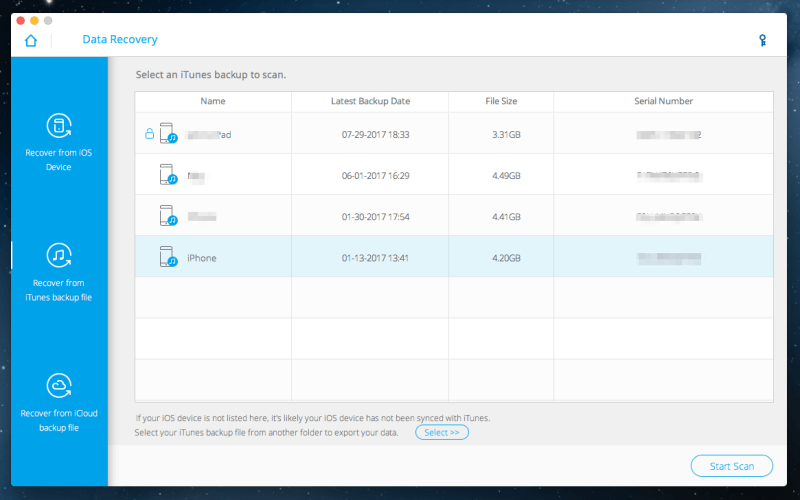
This mode is more like an iTunes backup extractor. Dr.Fone analyzes the iTunes backups saved on your PC or Mac and then extracts files from them. Note: you have to run the program on the computer with which you’ve synced your iPhone before. Otherwise, it won’t find any backup to scan.
On my MacBook Pro, Dr.Fone detected four iTunes backup files, one of which was from my lost iPhone. One small issue: it showed my last backup date to be in XNUMX. However, my device was lost a year ago, and there’s no way someone else was using my device on my Mac. The bug was probably associated with the iTunes app or Dr.Fone.I couldn’t really tell. But that’s not the point–our goal is to evaluate how effective the program is at restoring files from an iTunes backup. So I selected my iPhone and clicked “Start Scan”.
In less than a minute, dr.fone found tons of recoverable items, which were listed based on file type. As you can see, there were XNUMX photos, XNUMX app photos, XNUMX app videos, XNUMX messages, XNUMX contacts, XNUMX call history. While photos and videos tend to be most important to many of us, I’m most interested in the call histories because iOS only displays XNUMX calls on the app, although Apple may quietly save them to iCloud.
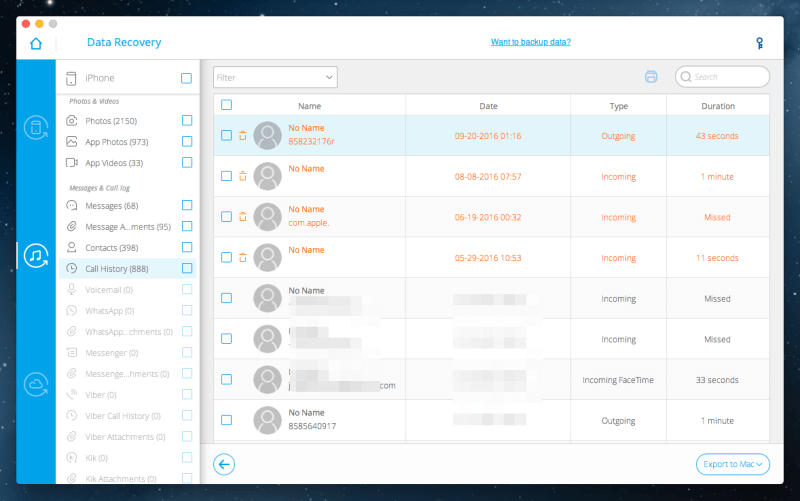
As you can see, Dr.Fone did find a list of calls with associated information like the name, date, type (incoming or outgoing), and duration. That’s not bad. To save those found items, just select them and click the “Export to Mac” (for Mac machines) button to continue.
Sub-test: Recovering iPhone data from iCloud backup file
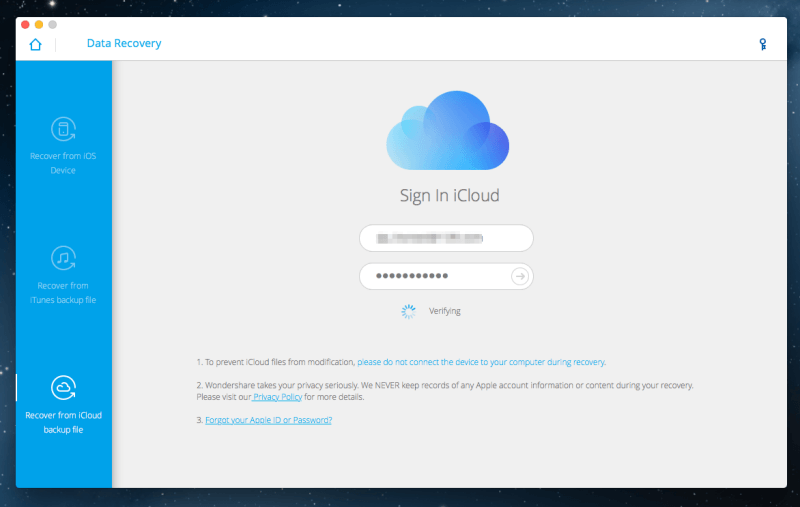
The process is quite similar to the “Recover from iTunes backup file” mode except you have to sign in iCloud with your Apple ID. Note: you’ll need to turn off two-factor authentication to proceed, otherwise dr.fone will pop up a warning.
Here’s the main screen of this mode. Once you sign in, the program verifies your account information. Wondershare understands that users may hesitate to give out their Apple ID information, so they disclaim that they never keep records of any Apple account information or content during your recovery and that you can visit their privacy policy page for more information.
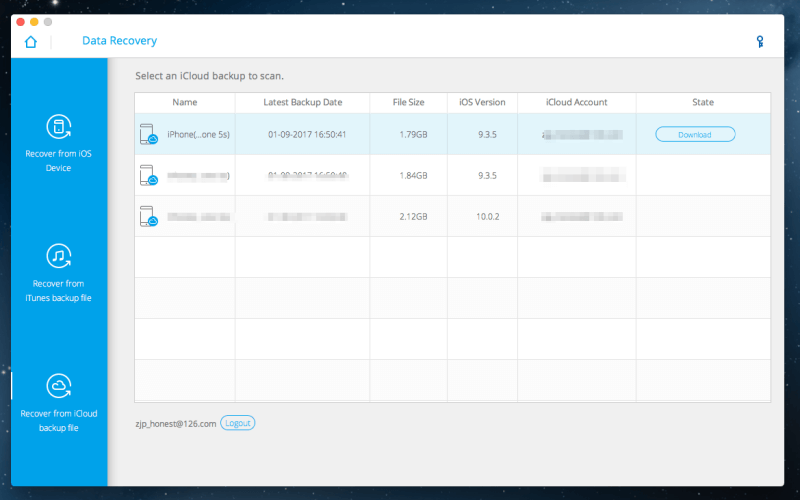
The program did find a few iCloud backups. To take a look at them, just click the “Download” button, choose the file types you want, and you’ll be able to access those files.
Test XNUMX: Recovering data from an iPad with Dr.Fone for iOS
Note: I used an iPad (XNUMXGB) for this test. To simplify your reading experience, I only tested the “Recover from iOS device” mode because the other two modes were explored in Test XNUMX above.
Once I connected my iPad to my Mac, I opened up dr.fone and clicked the “Data Recovery” module. The program detected my iPad without any issues, as you can see in the screenshot below. I clicked the dark blue “Start” button and a scan started. The process took about seven minutes to complete. Note: it seems the development team has resolved the status bar issue. Six months ago, I was testing an earlier version and the program kept getting stuck on XNUMX% during the scan. In this version, that issue did not recur.
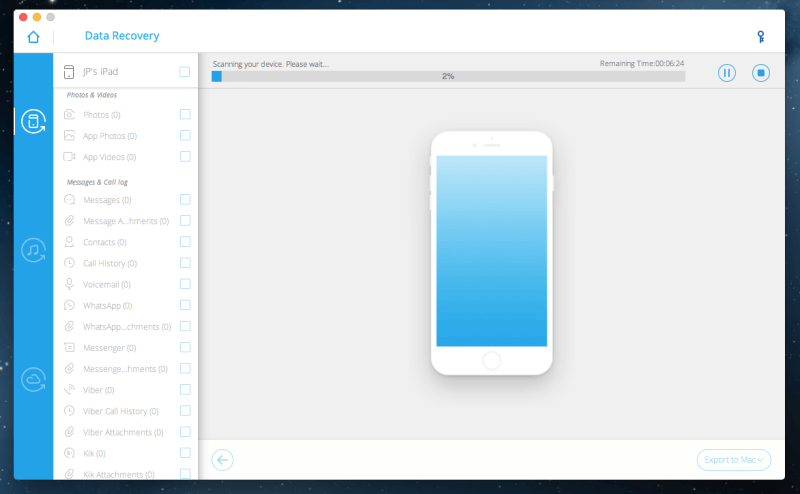
At first glance, I was happy to see all the photos Dr.Fone found on my iPad. There were XNUMX of them. Since the program allows me to export those found images to Mac, I selected a few images and clicked the “Export to Mac” button to save them.
I opened the folder containing those recovered photos…looking good! However, I noticed there was an issue regarding the file size. As you can see from the screenshot below (pay attention to the Size volume), the size of those saved images were all less than XNUMXKB — which definitely looks weird, because the actual size of a photo taken on my iPad is a few Megabytes (MBs). Clearly, the quality of recovered photos is NOT the same as the originals.
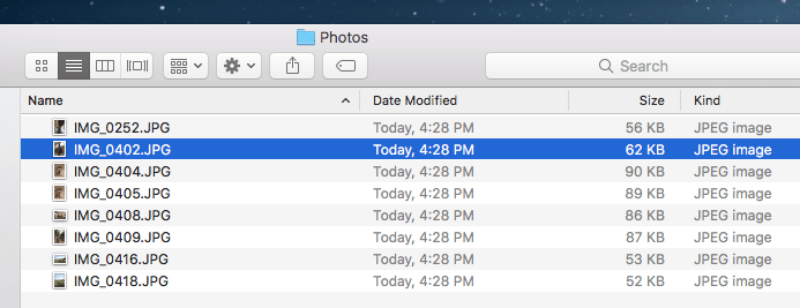
Also, I had another interesting find: Aren’t those photos still on my iPad? I checked — turns out I was right. The photos Dr.Fone found are all existing pictures on my device.
Therefore, in order to test whether or not the program really works to rescue deleted files on an iPad, I deleted XNUMX pictures and videos off the Photos app on my iPad and made sure they got erased from “Recently Deleted” under Albums. I also removed some unimportant contacts just to add a bit of complexity.
Then I deselected the “Existing Data on the Device” option and clicked Start. Here is a screenshot of the scanning in process. It took almost the same amount of time for the process to complete.

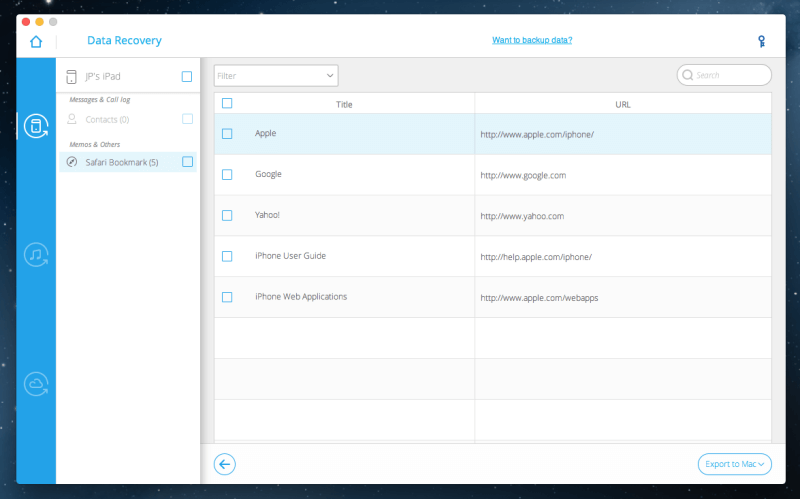
And the result? Only a few Safari bookmarks were found and listed there, and I’ve no idea when I deleted them. What surprised me most is that none of my deleted photos, videos, and contacts were found. dr.fone definitely failed this test.
Test XNUMX: Recovering data from Samsung Galaxy with Dr.Fone for Android
For the Android version, I’ll try to cover as many features as possible, although for this part of the review, we’ll focus only on data recovery. Dr.Fone is compatible with most Samsung and LG devices, as well as a number of old Android devices.
To test the program, I made up some contacts, text messages, calls, pictures, and etc. on a Samsung Galaxy which I then deleted. To give the program the best possible scenario, I scanned the smartphone right after deleting the data to lower the probability of it being overwritten.
Note: Despite this program being marketed for Android, it does not work on all Android devices. To check whether your device is compatible with dr.fone, use the trial version first. Alternatively, you can check here to see if your device model is supported.
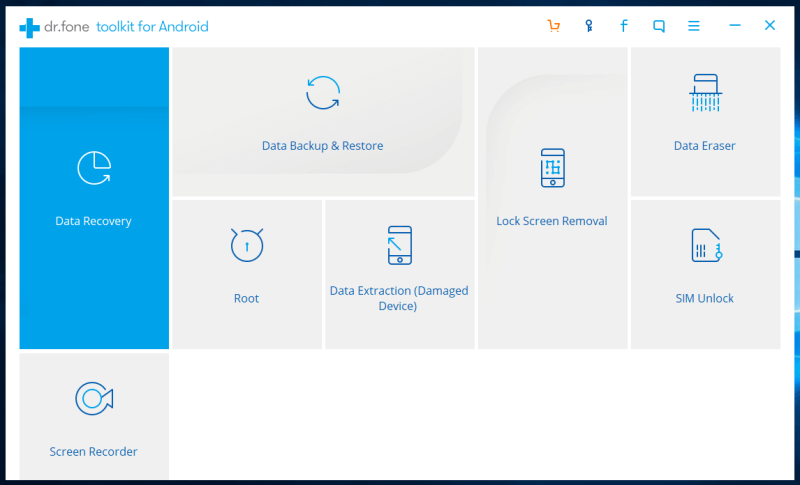
The startup window of Dr.Fone shows many features to choose from. You need to be connected to the internet when using a feature for the first time since the program will need to download additional files.
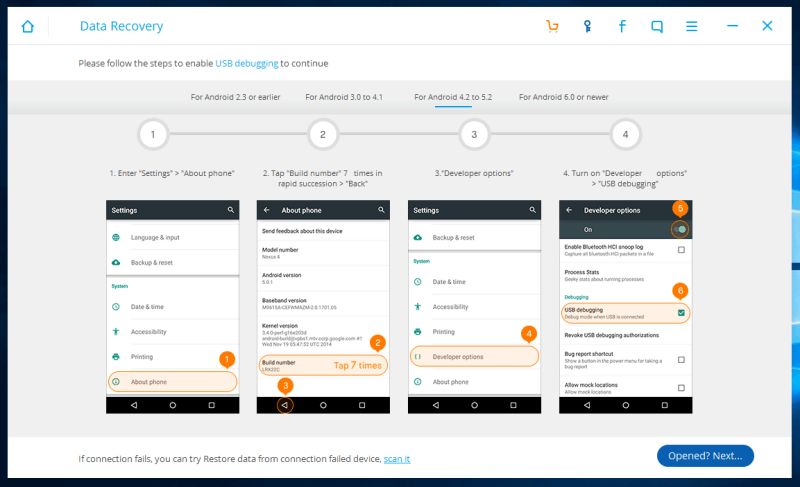
We’ll test out the data recovery feature of Dr.Fone, although for it to work we’ll have to configure the smartphone. USB debugging must be enabled to allow Dr.Fone to make changes to the device. The process looks different on each device model, but the instructions should be very similar.
The app has very clear instructions on how to enable USB debugging for most Android versions. First, go to your settings, then click on “About Phone”. Now, look for the “Build Number” and tap it XNUMX times. Developer options should then pop up in your settings menu, usually just above the “About Phone” text. Click on “Developer options”, then click the top-right switch to enable changes in the settings. Lastly, scroll down, look for “USB debugging”, and enable it.
To check if you’ve done it correctly, connect your smartphone to your computer via USB and see if there’s a notification on your phone screen indicating that USB debugging is working.

Once you’ve properly configured USB debugging, connect your smartphone to your computer. It should automatically connect. If not, click next. Dr.Fone will then install drivers, which should take just a couple of seconds. Once the installation is finished, you’ll be given options for what type of data you want to recover. I decided to just select everything and see what happens. Once you’re done, simply click “Next”.
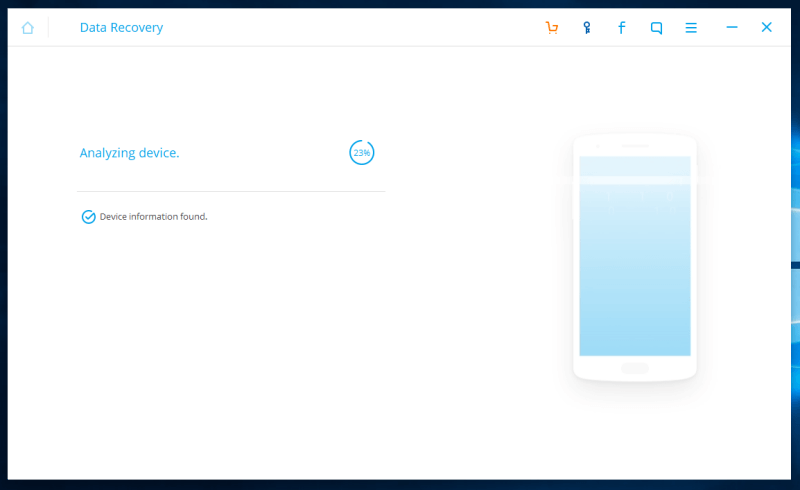
Dr.Fone will then analyze the device, which takes about XNUMX minutes. It will also ask for root permission if it’s available, which will need to be approved on the smartphone itself. Our device was rooted, and we did give it permissions, hoping that it would help recover our deleted data.
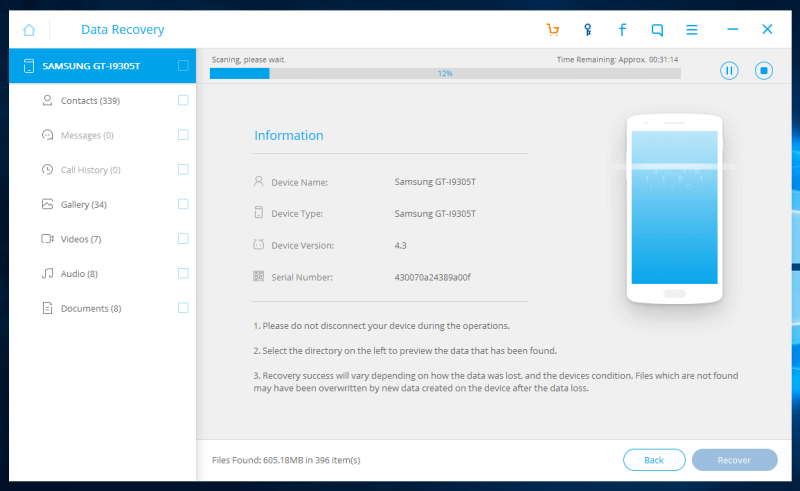
Once the analysis is finished, it’ll automatically start scanning your device. Our device only had XNUMXGB of internal storage with no microSD cards plugged in. Dr.Fone had no problem scanning; the process took only XNUMX minutes to complete.
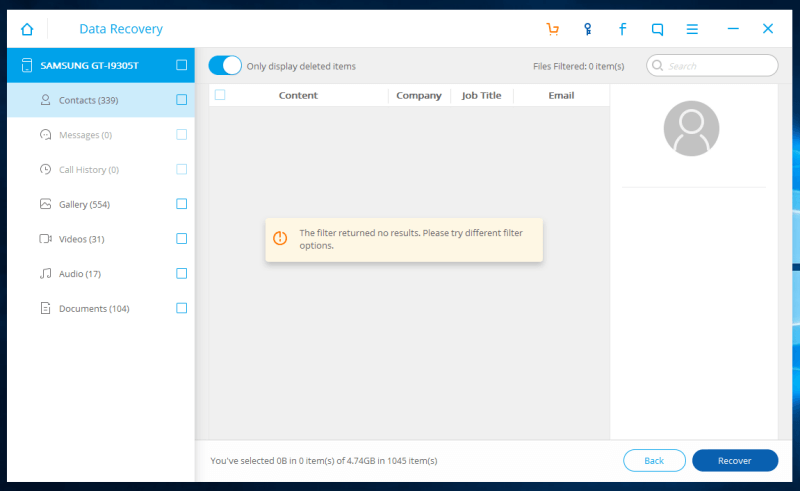
Dr.fFone found about a thousand files amounting to XNUMX GB. Sadly, it wasn’t able to recover any text messages or call history. I looked for my test contacts, but none were found. I turned on the “Only display deleted items” option at the top — still no contacts. Apparently, the contacts that were found were still on the smartphone. I don’t understand why those are still included in the scan, and I can’t see much use for that feature.
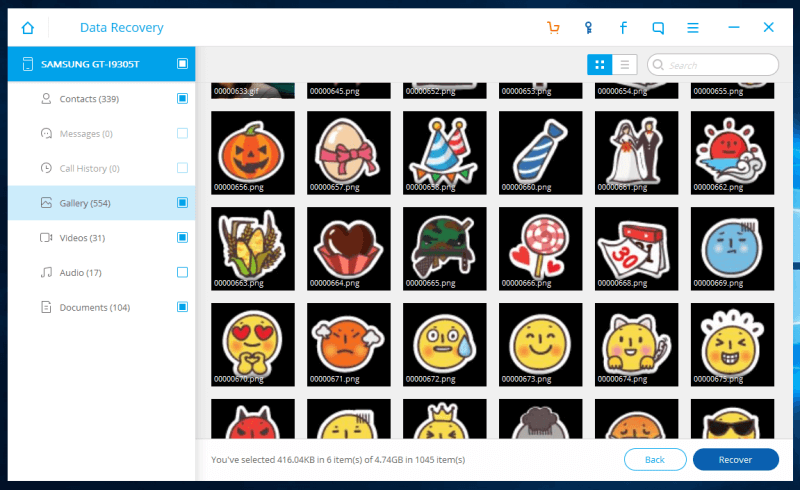
Going to the gallery, there were tons of photos. Some are photos I took with the camera, but most of the images were comprised of files from various applications. I didn’t find the test images I was looking for. Weirdly, all the photos and image files listed were still on the device itself. None of these files were deleted from the smartphone. I also noticed the same thing with the videos that Dr.Fone found. Just like how it performed with Apple devices, Dr.Fone still failed to recover any of our deleted files.
Inne funkcje
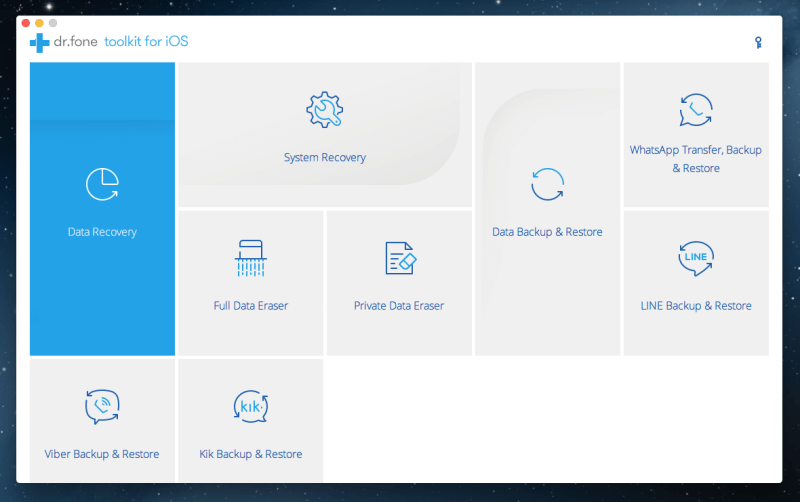
Data Recovery is just one of the many features Dr.Fone offers. As you can see from the main interface of Dr.Fone for iOS (on macOS), a number of other small utilities that are part of the program. Interestingly, the bottom-right corner is blank. My hunch is the Wondershare team did that on purpose in case any new features will be added to the program.
- Viber Backup & Restore – This feature allows you to backup your Viber texts, attachments, and call history and restore them at a later time. You can either restore your files to another Apple device or export chat files as HTML to read on your computer. You can check here to see if your Apple device is compatible.
- System Recovery – A system recovery can be useful when your Apple device has been soft bricked. This means that the device is unusable but still turns on. This includes problems such as a black screen, stuck on the Apple logo on startup, and so on. This feature restores iOS back to normal without deleting any of your important data. Dr.Fone says that this feature works for all iOS devices, which is great.
- Full Data Eraser – The Full Data Eraser permanently deletes all the data you want off your iOS device. This makes the software brand new as if it wasn’t used before. It also makes data recovery tools (such as the data recovery features in Dr.Fone itself) unable to recover your data. I think it’s a pretty useful feature if ever you want to sell or give away your iOS device. This feature is currently only available for iOS devices.
- Private Data Eraser – This feature is similar to the full data eraser but only deletes your selected private data. It lets you keep certain apps and unneeded data intact. This could be useful for keeping your deleted data irrecoverable without having to wipe your entire device.
- Kik Backup & Restore – Similar to the Viber feature, this one is for Kik. You’ll be able to back up your messages and other data from the app and restore it on the same or a different device. This is great for when you’re changing to another device and want to keep your Kik data.
- Data Backup & Restore – This feature lets you back up all your data from your iOS device in just one click. The data backed up can either be exported to a computer or restored onto another iOS device. This currently works for all iOS devices.
- WhatsApp Transfer, Backup & Restore – The WhatsApp feature lets you transfer your data from one iOS device to another iOS or Android device. Similar to the other features, you can also back up your data, such as messages, and restore it.
- LINE Backup & Restore – Along with the Viber, Kik, and WhatsApp features, Dr.Fone also has the same features as LINE. You can save your messages, call history, and other data from your iOS device to restore on the same iOS device or a different one.
The Android version of Dr.Fone for Windows also has other features besides data recovery. There’s quite a big difference between the two versions. I’ll guide you through each feature and its compatibility with different Android devices.
Rejestrator ekranu – The screen recorder feature does exactly what it says. It records whatever happens on the screen of your Android phone. You just need to launch screen recorder on your computer then connect your Android smartphone via USB. Done correctly, you should be able to see your Android screen on your computer and start recording. There’s also no need to worry about device compatibility since this feature works on ALL Android devices. Neat!
Data Backup & Restore – This feature creates a backup of your important files and restores them when needed. The list of files supported for backup and restore are:
- Kontakt
- Wiadomości
- Call History
- Gallery Photo
- Wideo
- Kalendarz
- Audio
- Zastosowanie
Do note that for application backups, only the application itself can be backed up. The application data, on the other hand, can only be backed up for rooted devices. Unlike the screen recorder feature, data backup & restore is only available for certain devices. You can check this list of supported devices to find out if your Android device is compatible.
Korzeń – Rooting your Android device opens it up to a whole new world of possibilities, although that privilege will cost you the warranty of your device. Be very careful when you root your phone: One mishap and you might end up with a paperweight. With this feature, you can easily (and safely) root your Android device. Firstly, check their list of supported devices for Android rooting before you start tinkering.
Data Extraction (Damaged Device) – Don’t get this feature confused with data recovery. Data recovery is for devices that are still working. Data extraction, on the other hand, restores data from damaged devices. The data on physically damaged devices is probably unrecoverable, although devices with software problems might still work. This feature will hopefully work for devices where the system has crashed, the screen is black, or other types of problems. This sounds like a great feature, but it’s only available for a select number of Samsung devices.
Lock Screen Removal – This is pretty self-explanatory. It removes the lock screen on the Android device which will grant you access to the smartphone. Along with most features, this is limited to select LG and Samsung devices only. We discourage using this feature without the consent of the owner of the device.
Data Eraser – If you plan on giving away or selling your smartphone, Data Eraser will prove very useful. Now that we know that data recovery programs are available for smartphones, securing our private data is crucial. Data Eraser deletes all kinds of personal data, leaving no trace at all. Unlike a simple factory reset, data eraser ensures that recovery programs (such as their own Dr.Fone Data Recovery) won’t be able to restore any personal data. Fortunately, this feature is currently available for all Android devices.
SIM Unlock – This feature allows carrier-locked smartphones to use SIMs from other service providers. It gives you the freedom to switch around and change service providers to get the best out of each of them. It’s a simple process in which you just connect your device to your computer via USB, run SIM unlock and run a scan, and if successful, you’ll have an unlocked smartphone. Sadly, this is one of their most limited features, and only supports a number of Samsung devices.
Reasons Behind Our Review Ratings
Skuteczność: 4/5
Dr.Fone failed our data recovery tests, no doubt. Now, why does it still get a XNUMX out of XNUMX stars? Because Dr.Fone isn’t just a data recovery program. It has over XNUMX other features we weren’t able to fully test. This might not be the program you want for data recovery, though it may prove itself useful if you want easy backup and restoration.
Cena: 4 / 5
Wondershare offers various packages to choose from for both Windows and Mac. The lifetime license for iOS is priced at $XNUMX for Windows and Mac. You can also slash off $XNUMX from those prices if you opt for a XNUMX-year license instead.
Łatwość użytkowania: 4.5/5
The program was extremely easy to navigate. Even someone that isn’t tech-savvy can easily navigate the program. There are instructions that automatically show if a problem arises, and those steps are easily understandable.
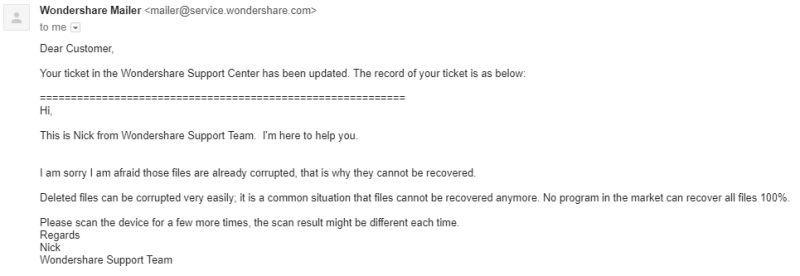
Wsparcie: 4/5
I emailed their support team regarding my results from the data recovery test and got a response the next day. I do appreciate the quick reply, although the content of the email simply says that my files have been corrupted and cannot be recovered anymore. They suggested simply scanning it a few more times, which might show different results.
Dr.Fone Alternatives
iCloud kopii zapasowej — Free. iCloud is a great data backup and recovery solution provided by Apple. It has been built into iOS devices which means you can backup your iPhone or iPad without connecting to a computer. Note: unlike Dr.Fone, iCloud is only helpful when you have a timely backup.
PhoneRescue — Similar to dr.fone, PhoneRescue also supports both iOS and Android and is compatible with Windows and macOS. But the program doesn’t offer many other features as Dr.Fone does. If you specifically want to retrieve lost files from an iPhone, iPad, or Android, PhoneRescue is a great option. Read our full Recenzja PhoneRescue.
Odzyskiwanie danych Stellar dla iPhone’a — What it offers is similar to the Data Recovery module in Dr.Fone. Stellar claims the program is able to directly scan your iPhone (and iPad too) to recover deleted Contacts, Messages, Notes, Call history, Voice Memo, Reminders, etc. A free trial is available with limitations.
You can also read our roundup of the best iPhone data recovery software i best Android data recovery software więcej opcji.
Wnioski
Dr.Fone, sadly, didn’t reach our expectations for data recovery. It was weird that it gave us some files that weren’t even deleted in the first place — again, your mileage with the software may vary. Although the scans were quite fast, and there’s a behemoth of other useful features, so it might still be worth your pretty penny.
Besides data recovery, Dr.Fone also offers over ten other features such as backups for various applications and data, system restoration, rooting, and much more. We weren’t able to test all its features, but if you need more than just data recovery for your Android and iOS devices, Dr.Fone would be a good program to check out. We recommend it.
So, how do you like this Dr.Fone review? Do you find the app useful? Let us know.
Derniers articles